Dhis Fhir Adapter sync patients
This tutorial aims to illustrate how to import patient records from hapi fhir into dhis2. We assume that you have successfully installed hapi fhir, dhis2 and dhis fhir adapter. We are exporting when data is flowing from dhis2 to hapi fhir. Conversely, we are importing when data is flowing from hapi fhir to dhis2. In this tutorial we are focusing on importing.
Use Case
For every patient resource created or updated in Hapi Fhir a corresponding tracked entity instance must be created or updated accordingly in Dhis2.
Patient (FHIR)
{
       "resourceType": "Patient",
        "id": "372",
        "identifier": [
          {
            "use": "usual",
            "system": "urn:mohzw:nid",
            "value": "18-0045679-P-18"
          },
          {
            "use": "temp",
            "system": "urn:uic:uid",
            "value": "HH00056890"
          }
        ],
        "name": [
          {
            "use": "usual",
            "text": " Tendai Musiyadzasukwa ",
            "family": "Musiyadzasukwa",
            "given": [
              "Tendai"
            ]
          }
        ],
        "managingOrganization": {
          "reference": "Organization/Organization/201",
          "type": "Organization",
          "identifier": {
            "use": "secondary",
            "system": "urn:ceshhar:uid",
            "value": "V-F"
          },
          "display": "Kwekwe"
        }
    }
Tracked Entity Instance (DHIS2)
  {
    "orgUnit": "UzdFXDOa3kh",
    "trackedEntityInstance": "teoyAwSquIZ",
    "trackedEntityType": "ZLLVYtKGbwk",
    "attributes": [
      {
        "code": "NationalId",
        "displayName": "National Id",
        "valueType": "TEXT",
        "attribute": "RXDd1a6TCwQ",
        "value": "18-0045679-P-18"
      },
      {
        "code": "UIC",
        "displayName": "UIC",
        "valueType": "TEXT",
        "attribute": "dOZBqYUzGh9",
        "value": "HH00056890"
      },
      {
        "code": "FirstName",
        "displayName": "First Name",
        "valueType": "TEXT",
        "attribute": "AOGa7sJPRx6",
        "value": "Tendai"
      },
      {
        "code": "Surname",
        "displayName": "Surname",
        "valueType": "TEXT",
        "attribute": "HMLh0p4e6sq",
        "value": "Musiyadzasukwa"
      }

    ]
  }
We have a tracked entity type with name, code and id as ‘Citizen’, ‘Ctzn’ and ‘ ZLLVYtKGbwk’ respectively. Its tracked entity attribute types are shown below:
| ID | Code | Name | Type | Unique | Mandatory |
|---|---|---|---|---|---|
| RXDd1a6TCwQ | NationalId | National Id | TEXT | true | true |
| dOZBqYUzGh9 | UIC | UIC | TEXT | true | true |
| AOGa7sJPRx6 | FirstName | First Name | TEXT | false | true |
| HMLh0p4e6sq | Surname | Surname | TEXT | false | true |
HATEOAS
Dhis Fhir adapter has a Hypermedia-Driven RESTful API that adheres to HATEOAS. Hence a basic of knowledge of HATEOAS is advantageous. You may find this article useful if you want some introduction to HATEOAS.
Fhir Client, System and Resources
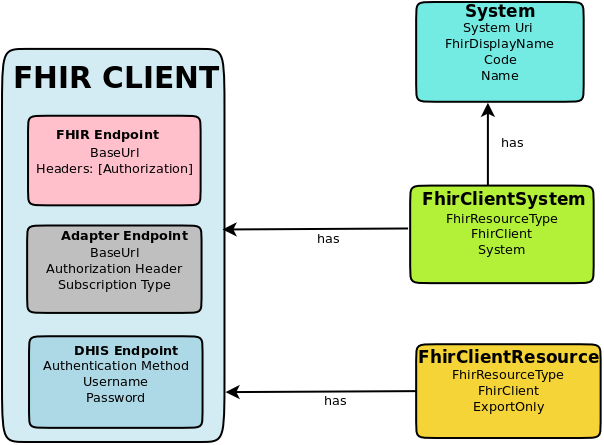
Firstly, we need to setup Fhir Client, System and Resource for patients. Usually, there is one Fhir Client for all the resources. So in this tutorial we assume we haven’t created any Fhir client yet. Each Fhir resource has its own system and resource definitions. Fhir Client
We use a Fhir Client to set up Fhir version and credentials of hapi fhir, dhis2 and adapter as well as base urls of hapi fhir and adapter. Note: the base url of dhis2 is configured in the application.yml of the adapter and we assume in this tutorial that this has been done already.
System
A system is an entity, branch or organization that creates and maintains identification or codes of resources. For example Ministry of Home Affairs manages the national identification of all citizens in Zimbabwe. So we can define a system named Ministry of Home Affairs Zimbabwe.
Fhir Client Resource
A Fhir Client Resource configures the export/import ability of a particular FhirResourceType in a FhirClient.
Fhir Client System
A Fhir Client System configures which system to be used as the primary identification of a particular FhirResourceType in a certain Fhir Client. For example we can use the Ministry of Home Affairs Zimbabwe system as the primary identification of a patient in our example.
Rules and scripts
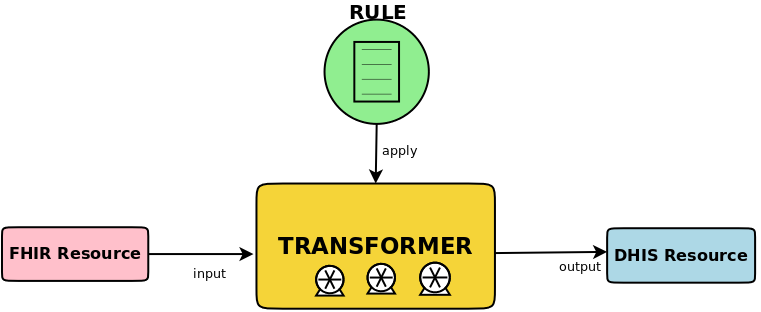
Rules are used when transforming a FHIR resource to a DHIS resource or vice versa. In this tutorial we will create a rule for transforming a FHIR patient resource to a DHIS2 Tracked Entity Instance. There are a number of transformers in the adapter that include TrackedEntity transformer, Enrollment transformer and Event transformer. The adapter will choose the appropriate transformer from its list of transformers therefore there is no need to create or choose an appropriate tranformer yourself. You only need to create rules that will assist a transformer to do the transformation. There are a number of default rules in the adapter which you may tweak to suit your use cases. However, in this tutorial we are going to create a new tracked entity rule from scratch so that you gain a deep and broad experience regarding a tracked entity rule.
Tracked Entity Rule
